
Appearance
Products
This is where everything you sell lives. Open Products from the menu to see them all, and press Create Product to add one.
Before you start, you need at least one category. A product cannot be saved without one.
The products list
The Products screen lists all of the products you have in your shop, newest first.
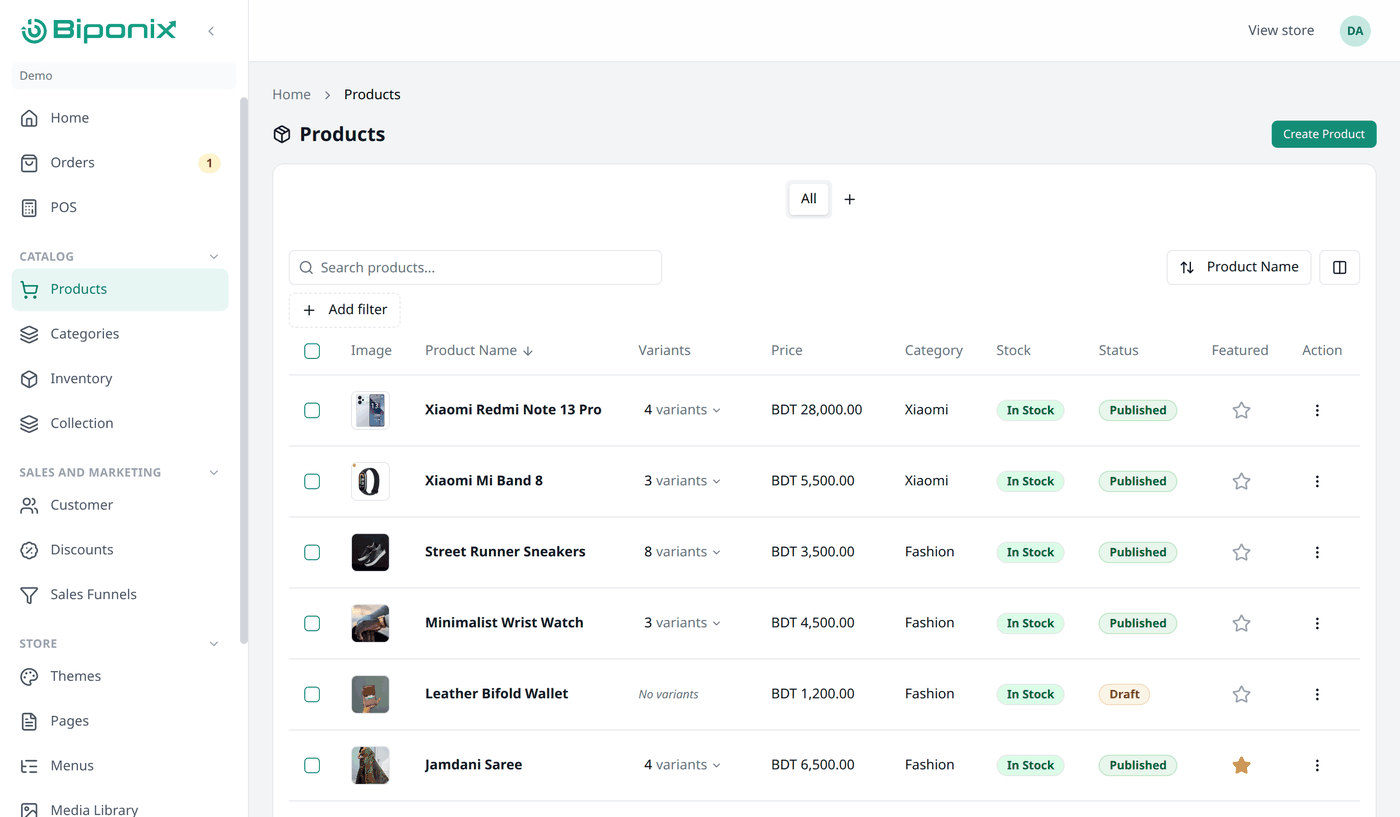
| Column | Description |
|---|---|
| Image | A thumbnail of the product |
| Product Name | Press it to open the product's edit screen |
| Variants | How many variants it has. No variants shows instead if it has none |
| Price | What you charge for it |
| Category | Which category it is in |
| Stock | Its stock status, In Stock or Out of Stock |
| Status | Its visibility status, Published, Draft, or Archived |
| Featured | Whether the product is featured |
| Action | Covered below |
Two more columns, Brand and Date, are hidden. Turn them on from the columns button.
Search and filters
This list works the same way as every other list in your dashboard. Working with lists explains searching, filtering, sorting and saving your own views in full.
Search lets you find a product by its name, SKU, or barcode.
Here are the available filters for this screen:
- Status — filter the list by Draft, Published, or Archived. Useful for showing only your drafts while you are still adding things.
- Category — filter the list by category.
- Brand — filter the list by brand.
- Stock Status — filter the list by whether it is In Stock or Out of Stock.
- Date — a date range, to filter the list by when it was created.
- Price — filter the list by a price range.
- Stock count — filter the list by a range of stock counts.
Action
Every product has a ⋮ button, which opens a few actions you can take for that product.

Edit
This button opens the edit page for a product, already filled with its data.
Preview
This button opens the product's own page on your storefront in a new tab, so you can see it the way a shopper does. A draft does not have a page yet, so publish it first.
Duplicate
This button makes a copy of the product and takes you straight to the copy's edit page, ready to edit. The copy keeps the description, pictures, options, prices and stock, and takes the same name with (Copy) after it. It is always saved as a draft, so nothing reaches your storefront until you say so.
The SKU and Barcode are left empty on the copy on purpose — those belong to one exact item, not to two.
Pro tip
If you sell many similar things, fill one in carefully, then duplicate it for the rest and change only what differs. You fill in the long form once instead of ten times.
Print barcode
This button gives you two label sizes, 1.5 × 1 in and 2 × 2 in. Pick one and your browser's print window opens with the labels ready.
Only items with a barcode get a label
Anything with the Barcode box left empty is skipped, and Biponix tells you how many were skipped. You can print for up to 100 products at a time.
Archive
Products cannot be deleted. When you stop selling something, use Archive instead.
An archived product leaves your storefront and disappears from this list. It is not gone: set the Status filter to Archived and it is there. Your old orders keep it too, so your records stay correct.
Unarchive brings it back as a Draft, never straight to your storefront. You decide when it goes on sale again.
Pro tip
Set the Status filter to Archived, then save it as a view of its own. It becomes a tab beside All at the top of the list, so from then on your archived products are one press away instead of a filter you have to set again every time. Working with lists walks through this one step at a time.
Bulk actions
Tick the box beside each product you want, and a Bulk actions button appears above the list. It holds Archive, Unarchive and Print Barcodes, and they work on every product you select at once. Your selections are kept as you move between pages, so you can gather a long list before you act on it.
Add a product
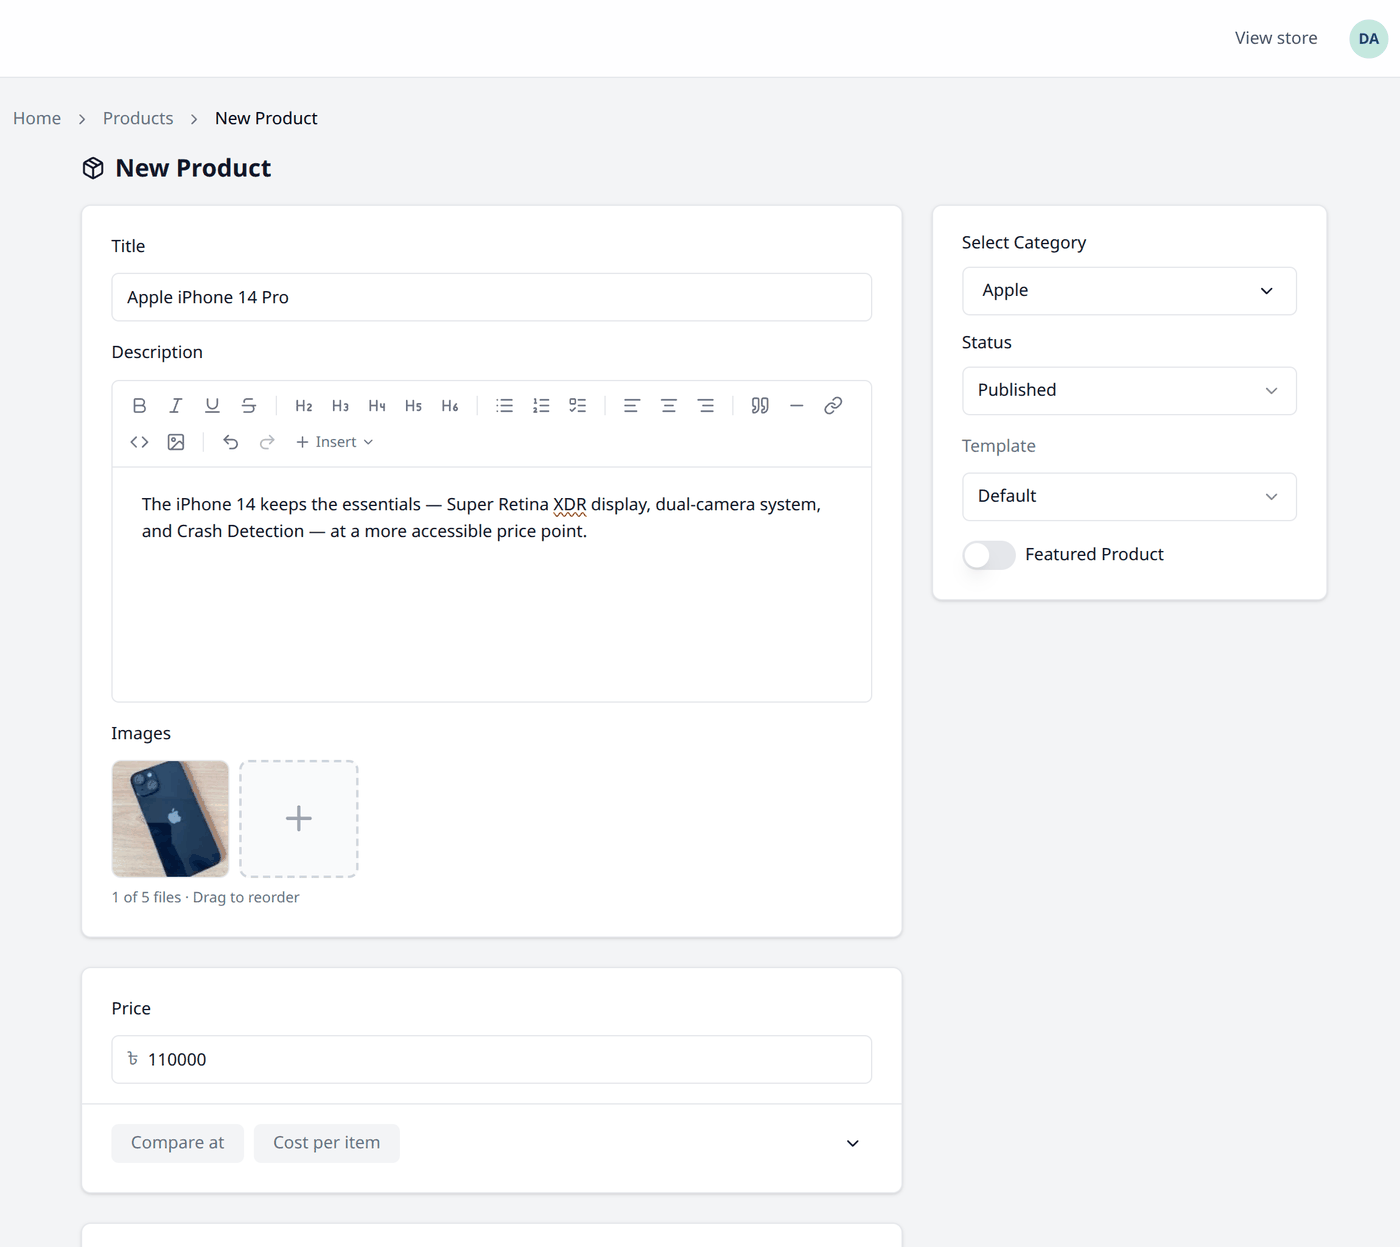
The form is one long page. These are the parts you must fill in:
| Field | What to put in it |
|---|---|
| Title | The name shoppers see. It must be at least five letters long, so very short names like "Cap" are refused. |
| Description | What the product is. Required, so write at least a line. |
| Images | At least one picture, and no more than five. |
| Price | What you charge for it. |
| Select Category | Which category it belongs to. |
You can drag the pictures to change the order in which they appear on the storefront.
Available Quantity sits under the price. You may leave it empty, but that will mark the product out of stock, which means nobody can buy it, so it is worth filling in.
Five more boxes stay closed until you need them. Press one to open it:
- Compare at — a previous, higher price, shown crossed out beside the current price.
- Cost per item — what the product cost you. Shoppers never see this.
- SKU and Barcode — your own codes for the item.
- Low stock alert — the number at which you count this item as running low. You can change it later on the Inventory screen.
Shipping Information holds the Weight, Length, Width and Height of the parcel.
Selling products that have variations, like sizes or colours
Scroll to Variants. Add an option such as Size or Colour, type the choices under it, and Biponix makes a row for every combination. Each row is a variant.
The moment you add a choice, the Price, Available Quantity and Shipping sections at the top of the form disappear. That is not a fault: each variant now carries its own price and stock, so the single price no longer applies. Product variants covers this in full.
Helping people find your product
Near the end of the form are two sections about search engine optimisation, or SEO — helping people find this product when they search.
Search engine listing
The same block you met on a category: Page title, Meta description and URL and handle. Biponix fills all three from your title and description as you type, so you can leave them alone unless you want something different.
Search aliases
Search aliases are other words that should find this product when a shopper uses the search box on your storefront — a local name, a different spelling, or another name people use for this product.
Press the pencil button to open the box, then Add another for each alias. You can add up to twenty. They stay behind the scenes: shoppers never see them on the page.
Saving
When you have added everything you want, press the Submit button at the bottom of the page.
New products go on sale straight away
Status is already set to Published when the form opens. Press Submit and the product appears on your storefront. If you are not ready for that, change it to Draft first. A draft is saved and waiting for you, and no shopper can see it.
What next
Selling one product in several sizes or colours is next: Product variants.